User Guide

1. Introduction
Are you a Teaching Assistant (TA) struggling to monitor your classes and what tasks you have to complete?
Tired of having to use multiple applications such as LumiNUS and Todoist to keep track of all your responsibilities?
Introducing ModQuik, a Teaching Assistant tool made for you!
ModQuik is a convenient tool that allows you to keep track of your classes, monitor your students’ grades and set up reminders for your tasks (such as creating tutorial slides or marking homework). ModQuik is optimised for use via a Command Line Interface (CLI) while still having the benefits of a Graphical User Interface (GUI). If you can type fast, ModQuik can get your lesson management tasks done faster than traditional GUI apps.
- 1. Introduction
- 2. Quick start
- 3. About this User Guide
- 4. GUI overview
-
5. Features
- 5.1 Student Features
- 5.2 Tutorial Features
- 5.3 Consultation Features
- 5.4 Reminder Features
- 5.5 Switch tabs:
switch - 5.6 Clearing data:
clear - 5.7 Viewing help:
help - 5.8 Exiting the program:
exit - 5.9 Saving the data
- 5.10 Editing the data file
- 5.11 Archiving data files
[coming in v2.0] - 5.12 Add existing student into multiple modules
[coming in v2.0]
- 6. FAQ
- 7. Appendix
2. Quick start
-
Ensure you have Java
11or above installed in your computer. For more instructions, click here. -
Download the latest
ModQuik.jarhere. -
Copy the file to the folder you want to use as the home folder for your ModQuik.
-
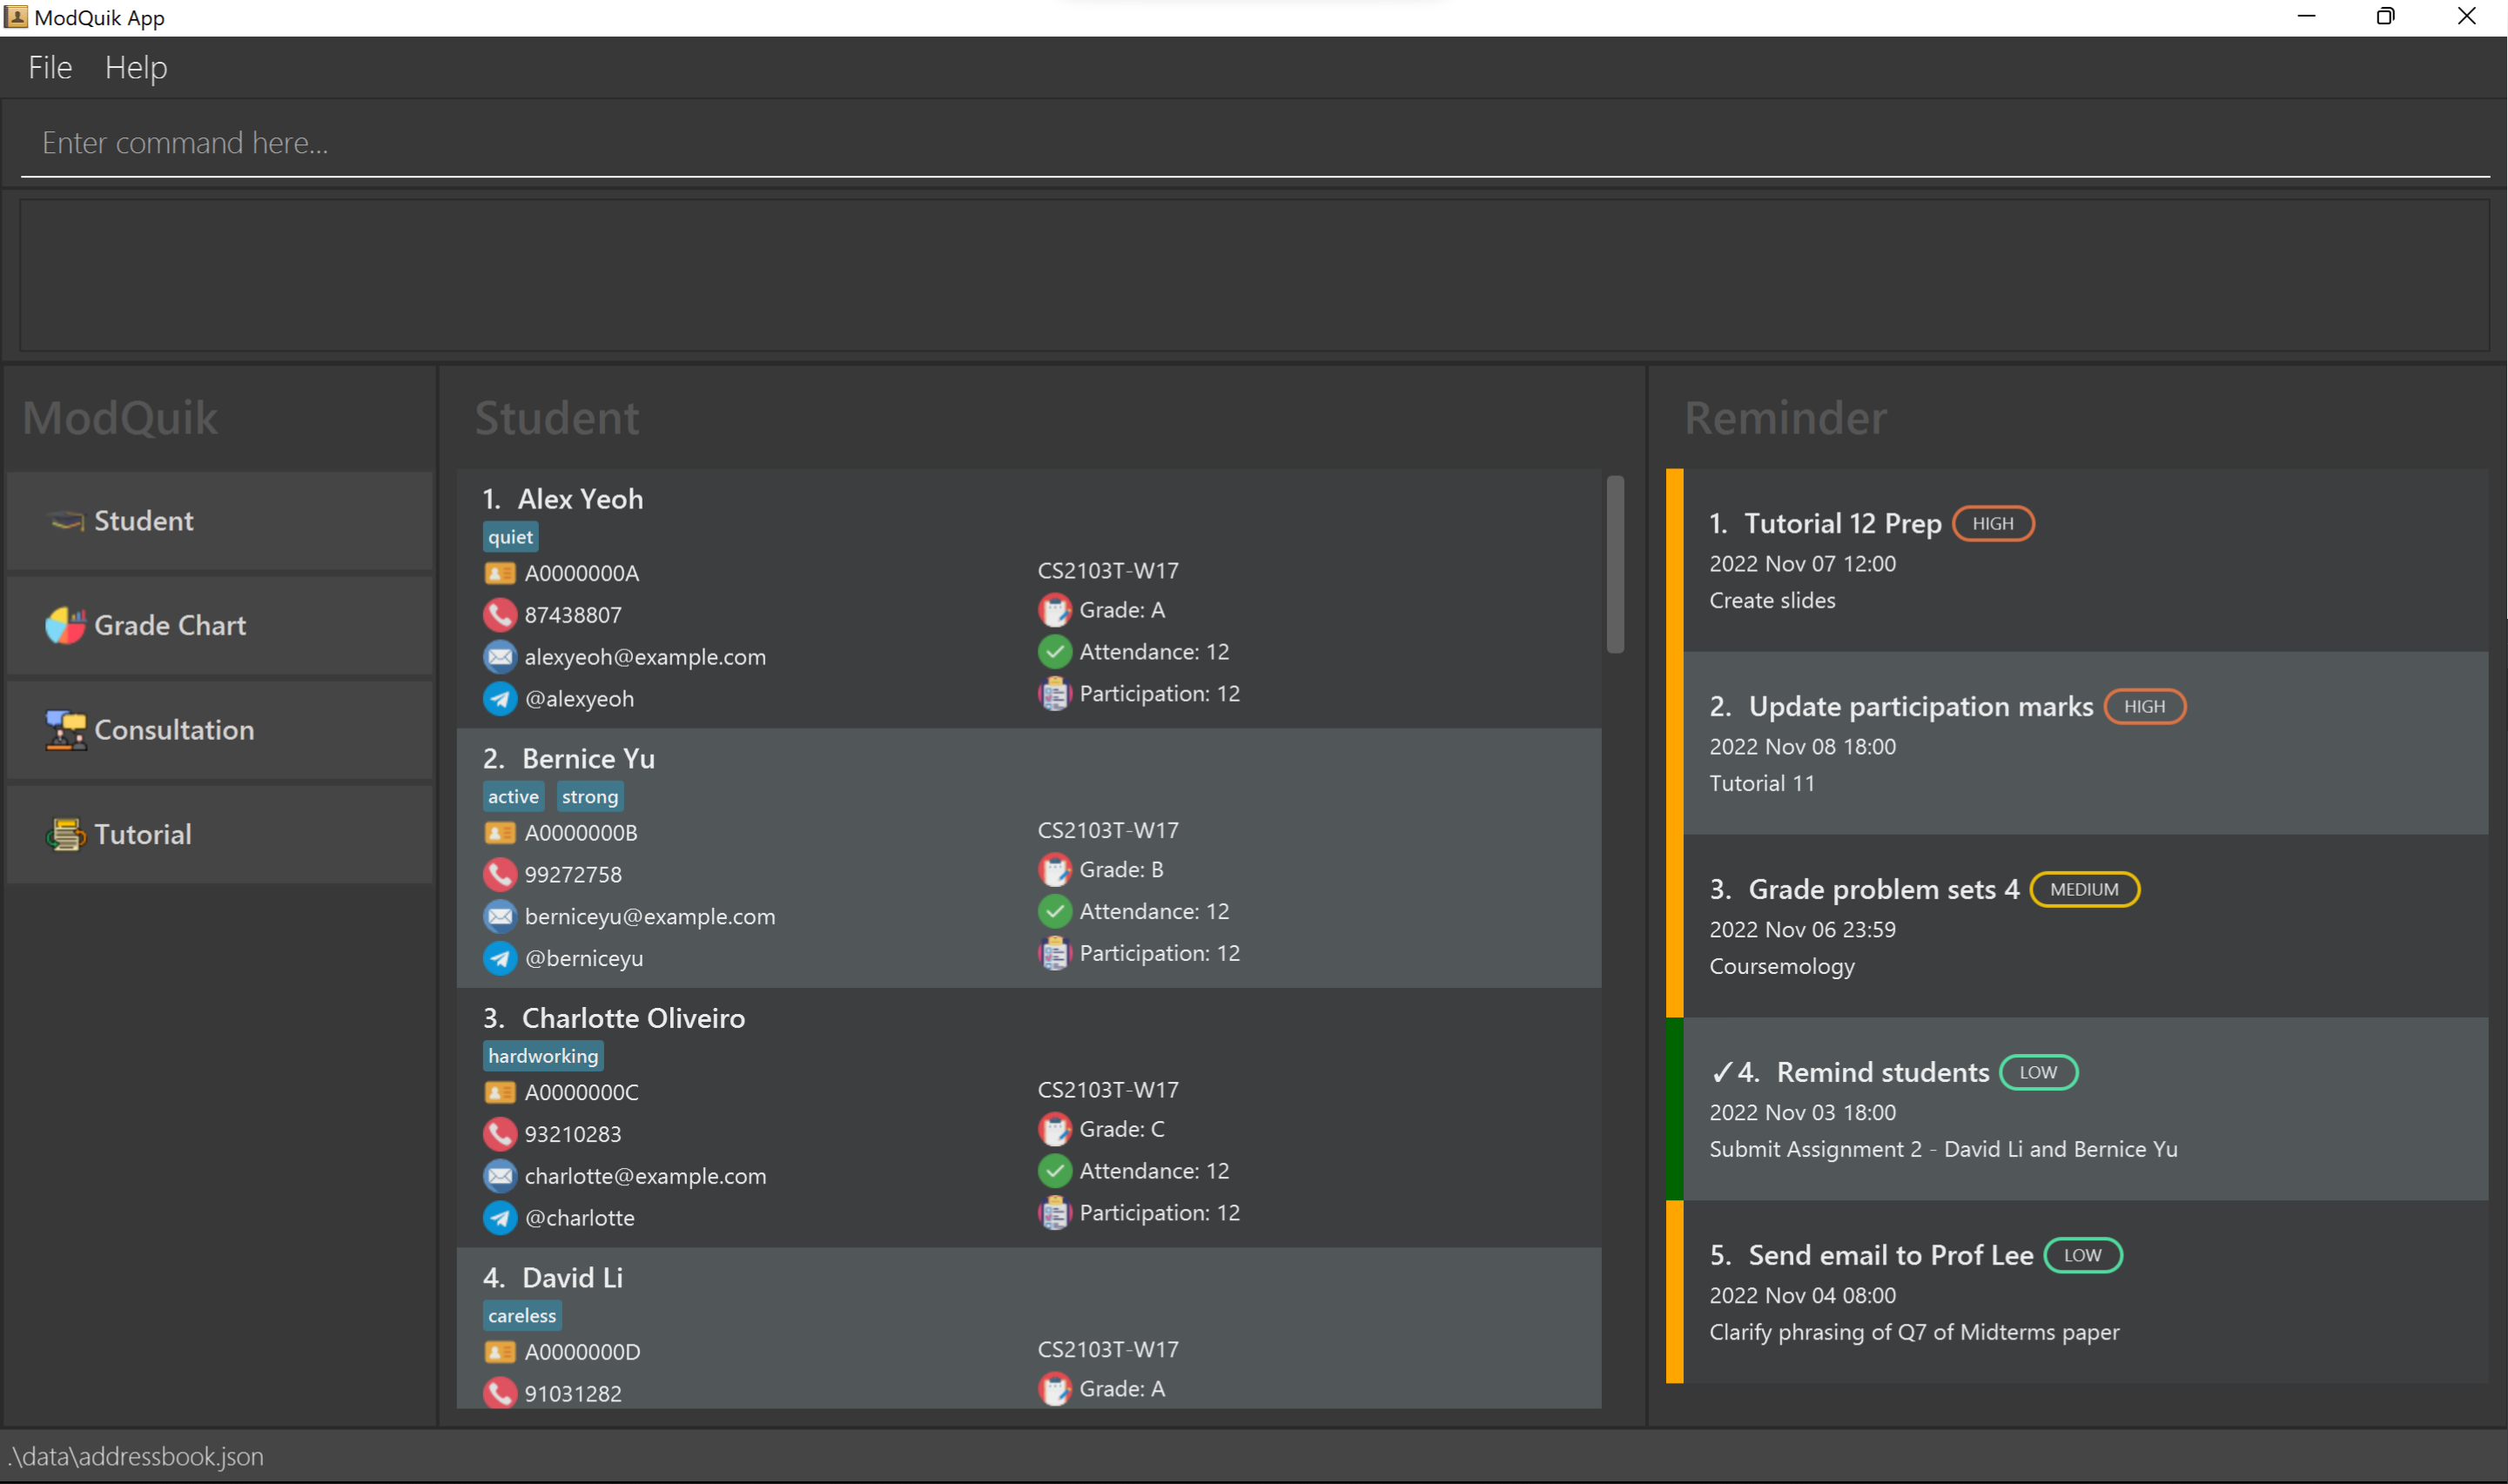
Double-click the file to start the app. The GUI as shown below should appear in a few seconds. Note how the app contains some sample data.
-
Type the command in the command box and press Enter to execute it. e.g. typing
helpand pressing Enter will open the help window.
Some example commands you can try:-
list: Lists all students. -
add studentn/John Doe i/A0232123X ph/98765432 e/johnd@example.com tele/johnDoe m/CS2103T tut/W17: Adds a student namedJohn Doeto CS2103T module. -
delete student3: Deletes the 3rd student shown in the current list displayed. -
switchf/grade: Switch the tab to view the grade charts for the respective modules you teach. -
clearf/reminder: Deletes all your reminders. -
exit: Exits the app.
-
-
Refer to the Features below for details of each command.
3. About this User Guide
This guide aims to
- Teach first-time users how to start using ModQuik
- Explain the features of each command and how to use them.
- Provides a summary of the:
- available commands with their respective formats
- available prefixes and which commands use which prefixes
3.1 Navigating the User Guide
Information Box
![]() Info: I am an example info box! I provide useful information.
Info: I am an example info box! I provide useful information.
Tip Box
![]() Tip: I am an example tip box! I provide pointers to advanced users to enhance experience.
Tip: I am an example tip box! I provide pointers to advanced users to enhance experience.
Warning Box
![]() Warning: I am an example warning box! I show important messages to take note to avoid any unintended effects.
Warning: I am an example warning box! I show important messages to take note to avoid any unintended effects.
Highlights
Highlighted text refers to commands, parameters, fields values or any user inputs.
e.g. commands PARAMETERS
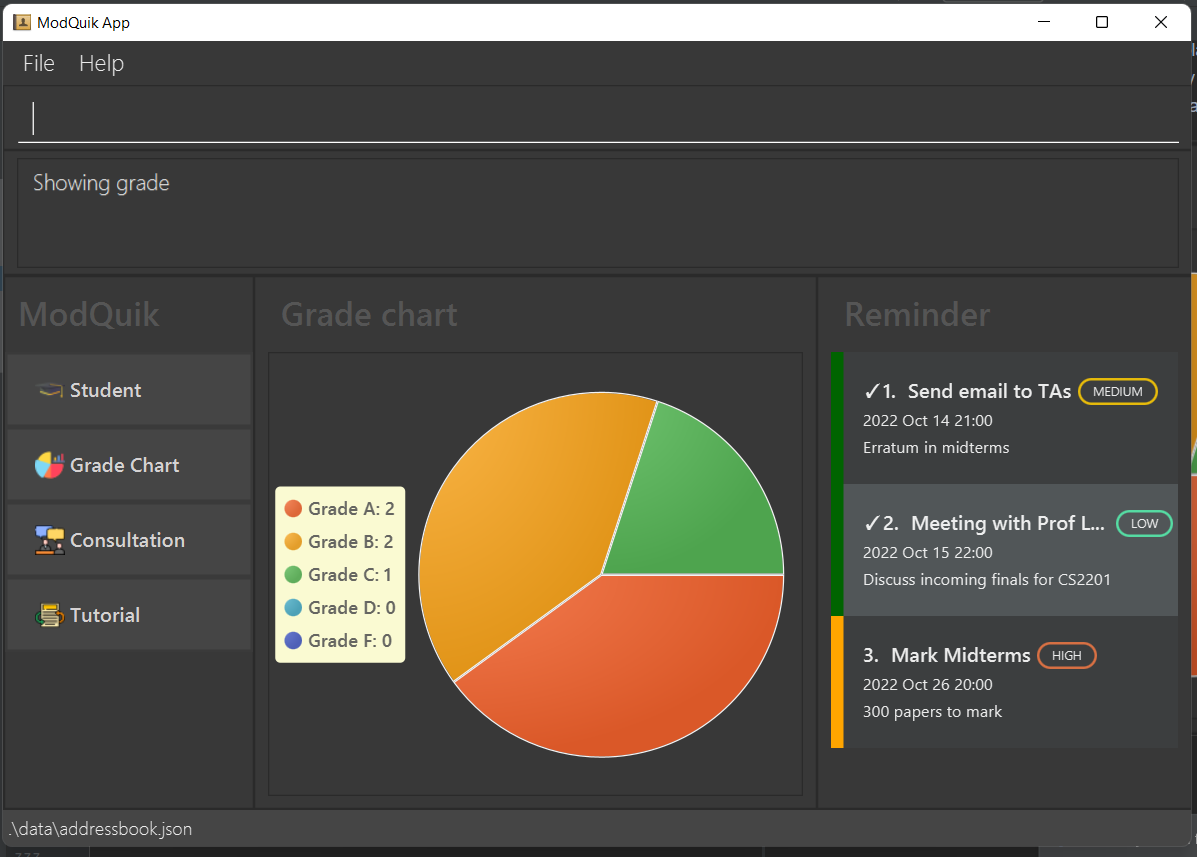
4. GUI overview
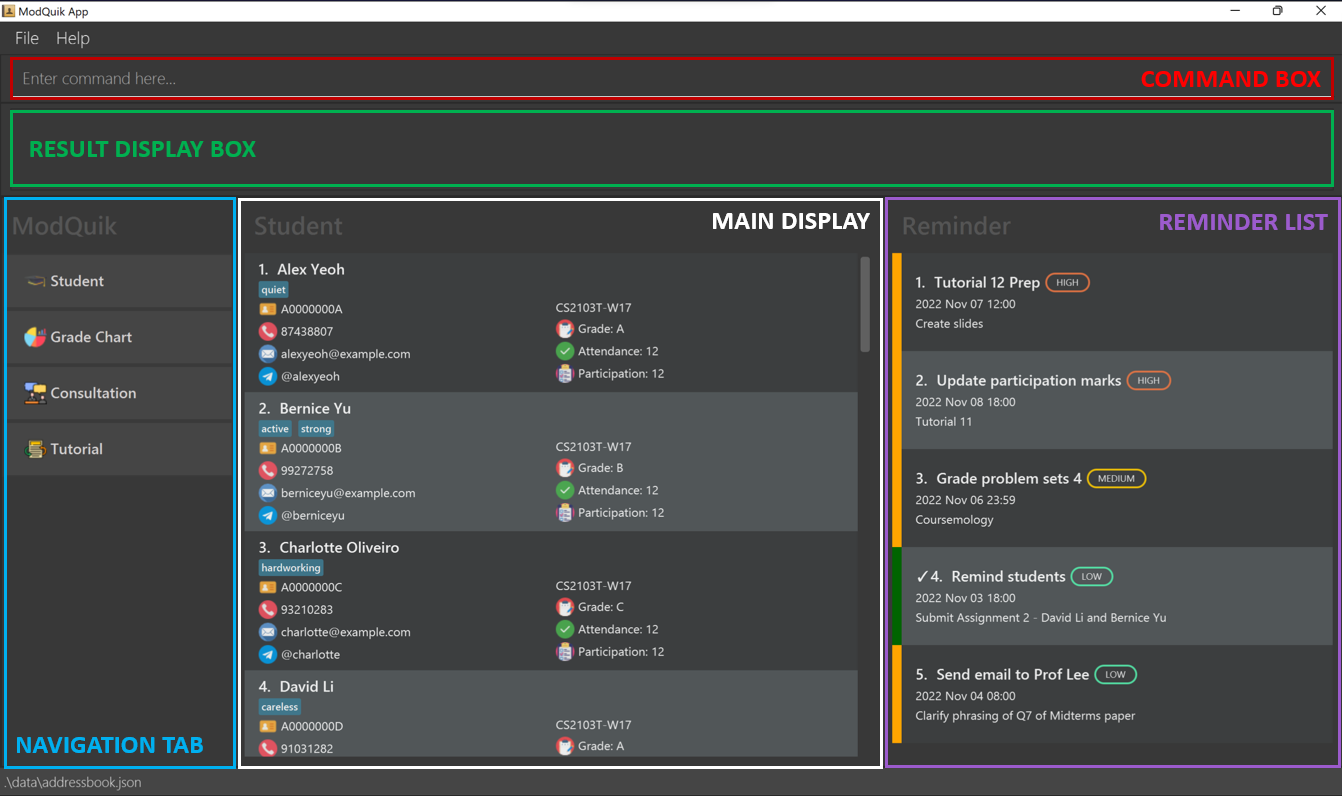
Command Box
Enter your command here.
Result Display Box
Displays a feedback message after a command is executed.
Navigation Tab
Displays the tabs that you can navigate to.
Main Display
Displays the list of your chosen tab.
Reminder List
Displays your list of reminders.
5. Features
![]() Notes about the command format:
Notes about the command format:
-
Words in
UPPER_CASEare the parameters to be supplied by the user.
e.g. inadd student n/NAME,NAMEis a parameter which can be used asadd student n/John Doe. -
Items in square brackets are optional.
e.g.n/NAME [t/TAG]can be used asn/John Doe t/friendor asn/John Doe. -
Items with
…after them can be used multiple times including zero times.
e.g.[t/TAG]…can be used ast/friend,t/friend t/familyetc. -
Parameters can be in any order.
e.g. if the command specifiesn/NAME ph/PHONE,ph/PHONE n/NAMEis also acceptable. -
If a parameter is expected only once in the command, but you specified it multiple times, only the last occurrence of the parameter will be taken.
e.g., if you specifyph/12341234 ph/56785678, onlyph/56785678will be taken. -
Inapplicable parameters for commands that do not take in parameters (such as
helpandexit) will be ignored.
e.g., if the command specifieshelp 123, it will be interpreted ashelp.
5.1 Student Features
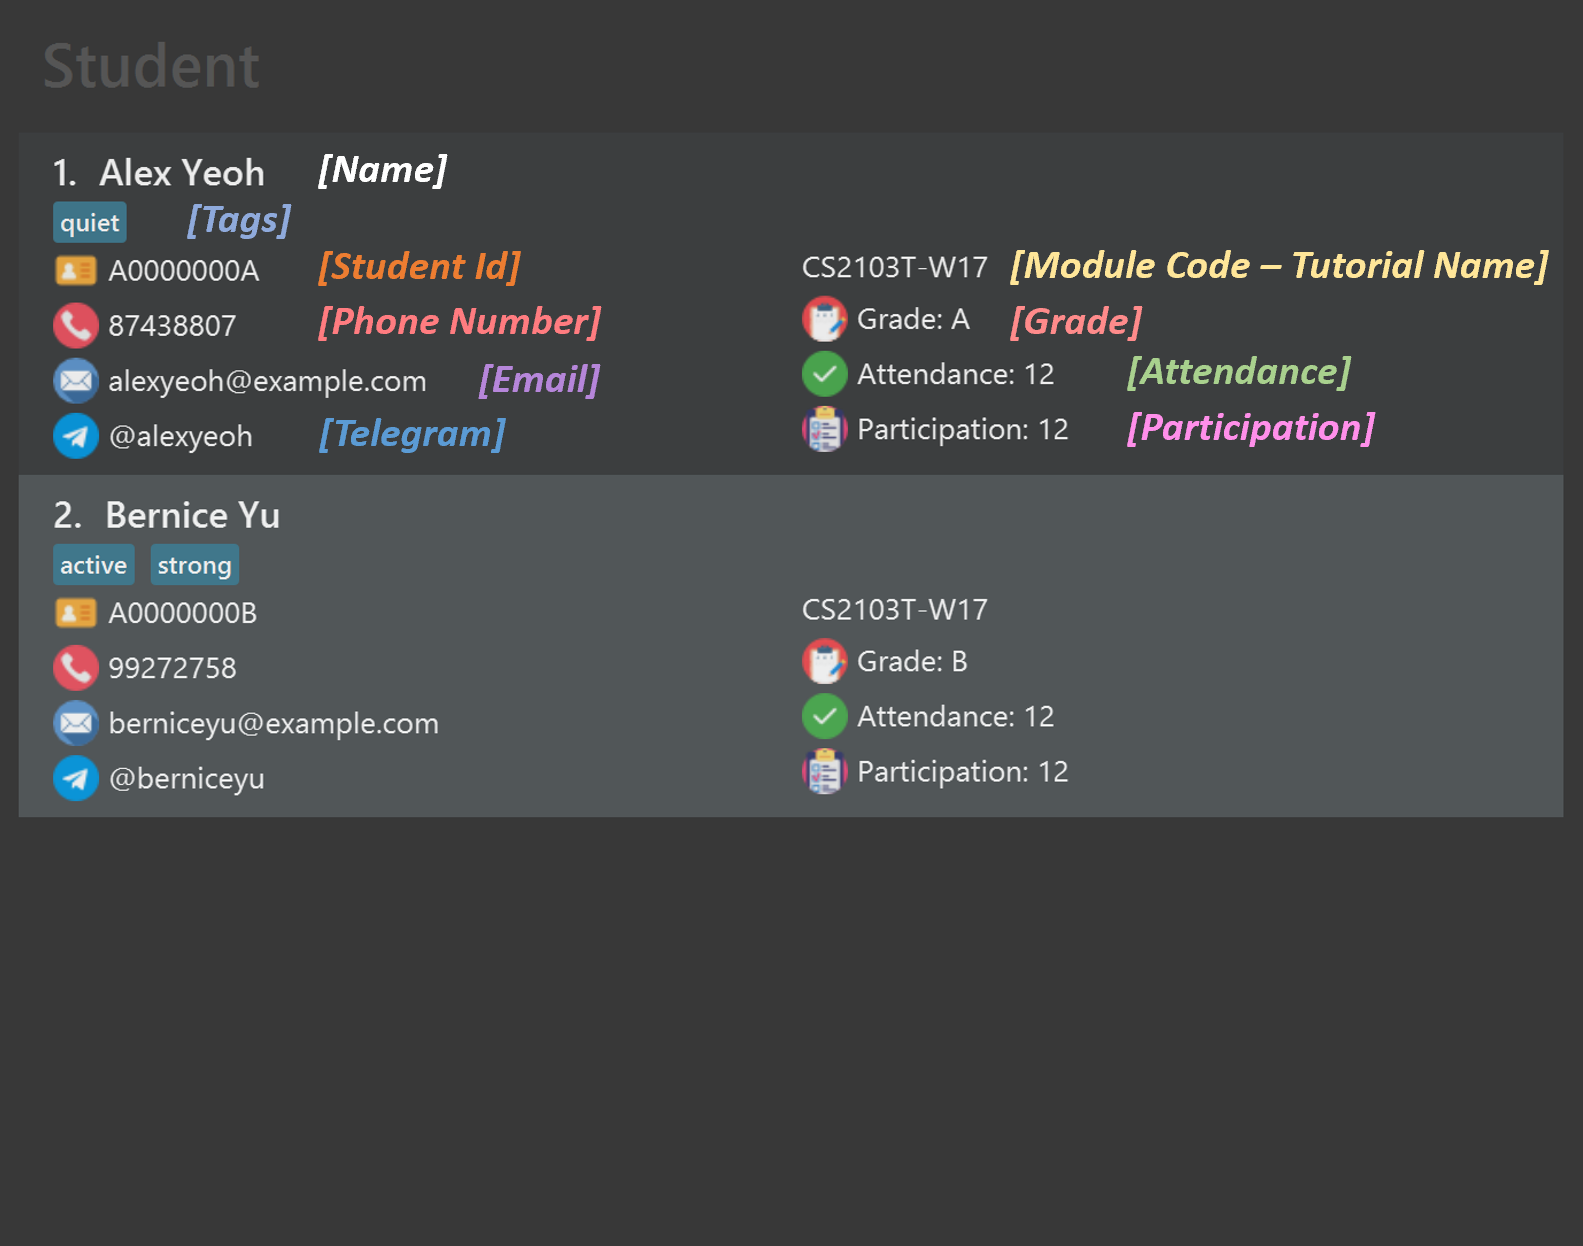
5.1.1 Adding a student: add student
Adds a student to the specified module.
Format: add student n/NAME i/STUDENT_ID ph/PHONE e/EMAIL tele/TELEGRAM_HANDLE m/MODULE tut/TUTORIAL [g/GRADE] [att/ATTENDANCE] [part/PARTICIPATION] [t/TAG]…
-
PHONEshould be 8 digits long as per standard telephone numbers in Singapore. -
STUDENT_IDshould follow the following format AXXXXXXXY, where X is a number, and Y is an alphabet. -
TELEGRAM_HANDLEfollows the format of a username on Telegram, taking in a-z, 0-9 and underscores. -
MODULEtakes in the module code YY[Y]XXXX[Y], where X is a number, and Y is an alphabet. [Y] indicates an optional alphabet. -
ATTENDANCEandPARTICIPATIONcan only take in integers greater than 0. If a value is not given, they will automatically be set to 0. -
GRADEcan take inA,B,C,D,F. If a value is not given, it will automatically be set toPENDING....
Examples:
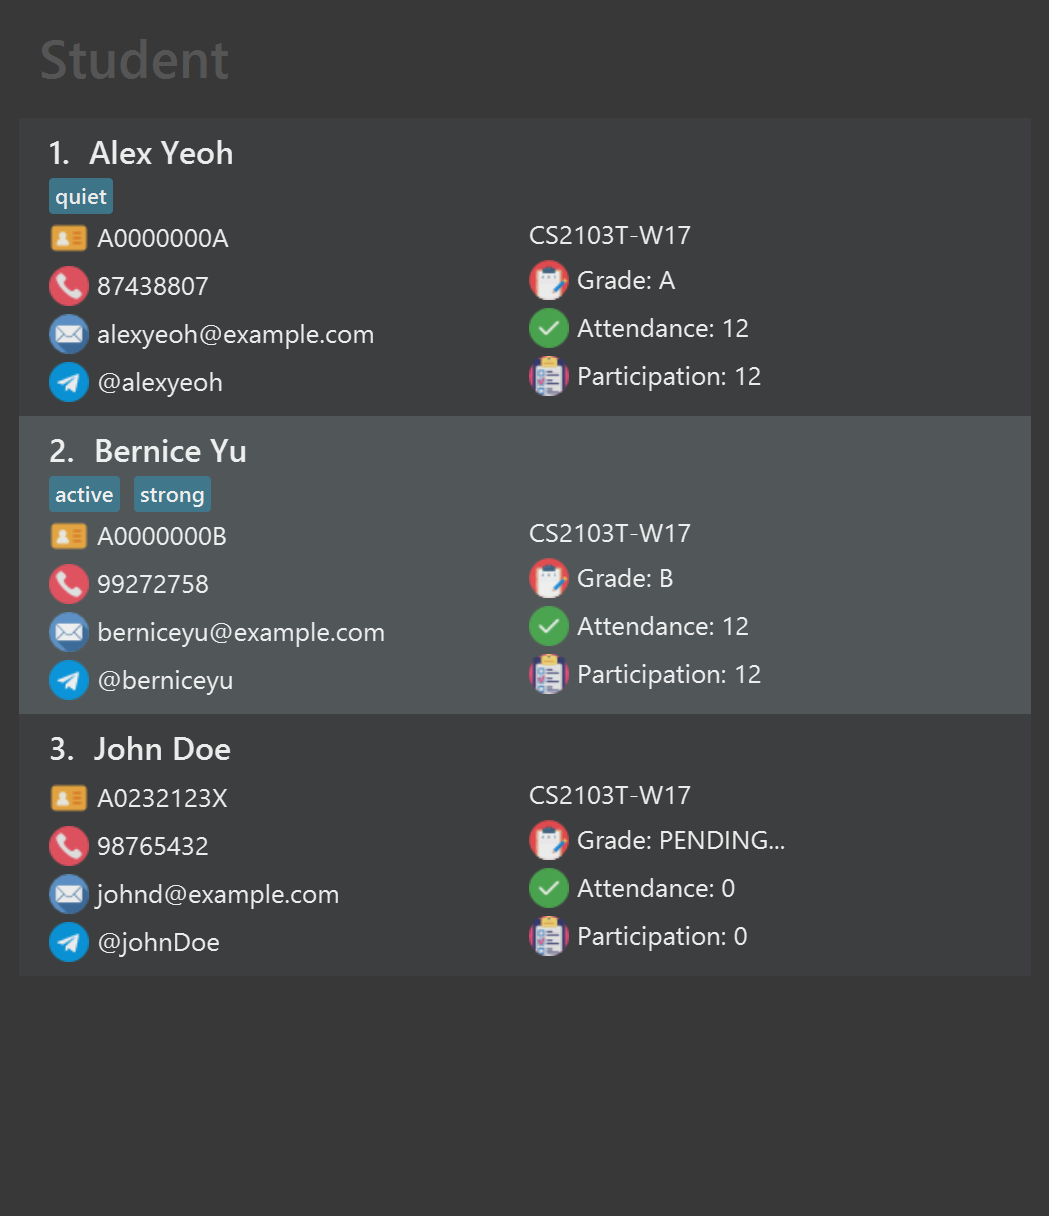
add student n/Betsy Crowe i/A0000000B t/struggling e/betsycrowe@example.com ph/91234567 tele/betsy_crowe m/CS2105 tut/G03 att/3 part/1 g/C t/quietadd student n/John Doe i/A0232123X ph/98765432 e/johnd@example.com tele/johnDoe m/CS2103T tut/W17
| Before (example 2) | After (example 2) |
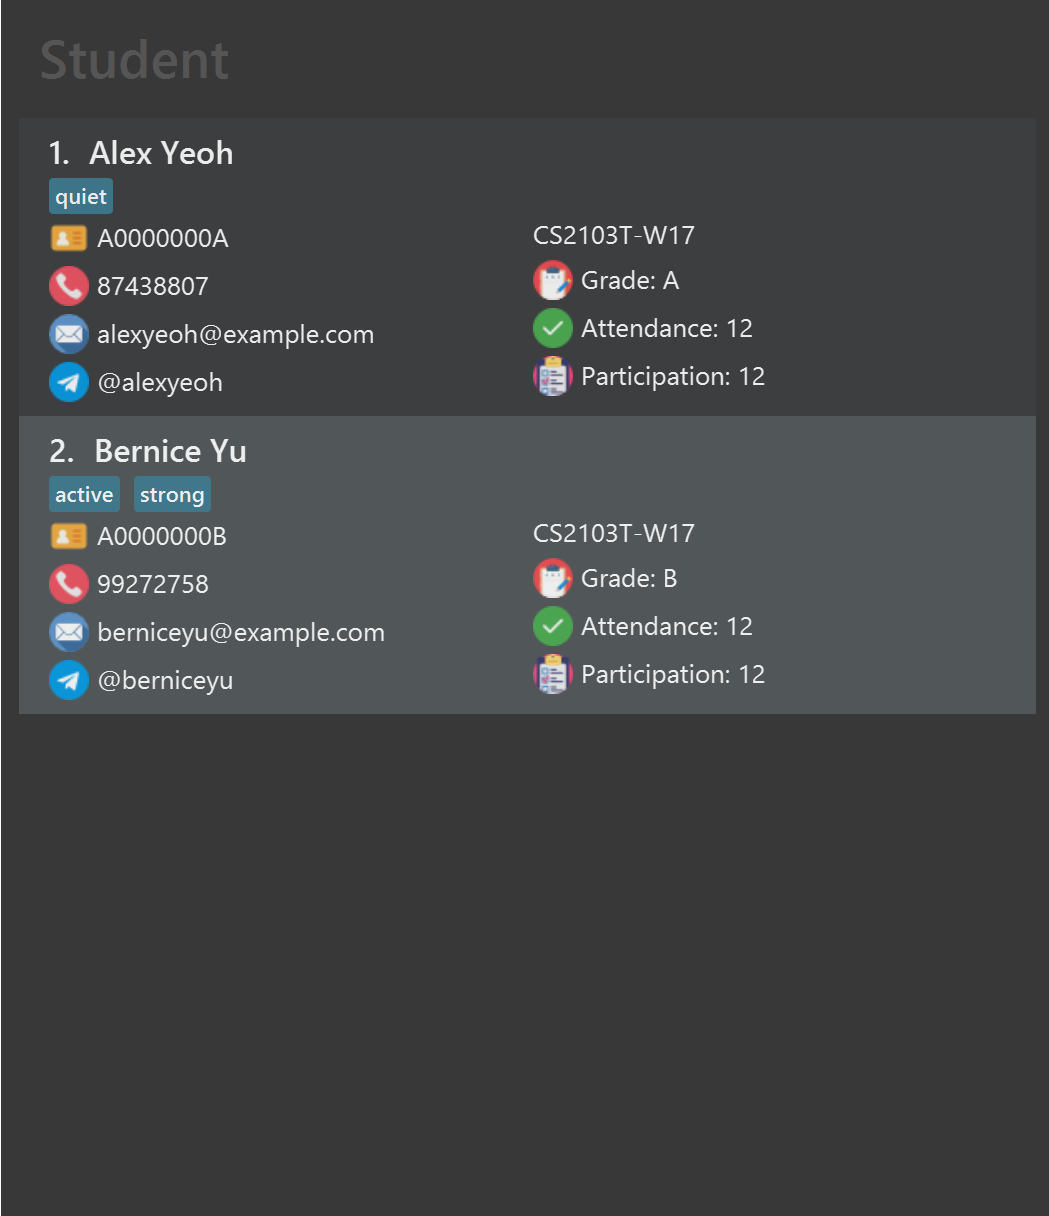 |
 |
5.1.2 Listing all students: list
Shows a list of all students in ModQuik.
- If the list of students is not currently active, it may appear that the command does not have any effect. Navigate to the
Studenttab to see the list of students.
Tab button to switch between the different tabs (Student, Grade Chart, Consultation, Tutorial) and the command box.
Alternatively, you can use the switch command if you would like to only use the keyboard.
Format: list
5.1.3 Editing a student: edit student
Edits an existing student in a specified module.
Format: edit student INDEX [n/NAME] [i/STUDENT_ID] [ph/PHONE] [e/EMAIL] [tele/TELEGRAM_HANDLE] [m/MODULE] [tut/TUTORIAL] [g/GRADE] [att/ATTENDANCE] [part/PARTICIPATION] [t/TAG]…
- Update your student’s grade after an assessment
- Update your student’s attendance and participation score after a lesson
- Update your student’s particulars
- Edits the student at the specified
INDEX. The index refers to the index number shown in the displayed student list. The index must be a positive integer 1, 2, 3, … - At least one of the optional fields must be provided.
- Existing values will be updated to the input values.
- When editing tags, the existing tags of the student will be removed i.e. adding of tags is not cumulative.
- You can remove all the student’s tags by typing
t/without specifying any tags after it. - If nothing is given to
GRADEeven thoughg/is typed into the command box, it will automatically be set toPENDING.... - If nothing is given to
ATTENDANCEeven thoughatt/is typed into the command box, it will automatically be set to0. - If nothing is given to
PARTICIPATIONeven thoughpart/is typed into the command box, it will automatically be set to0.
Examples:
-
edit student 1 ph/91234567 e/jameslee@example.comEdits the phone number and email address of the 1st student to be91234567andjameslee@example.comrespectively. -
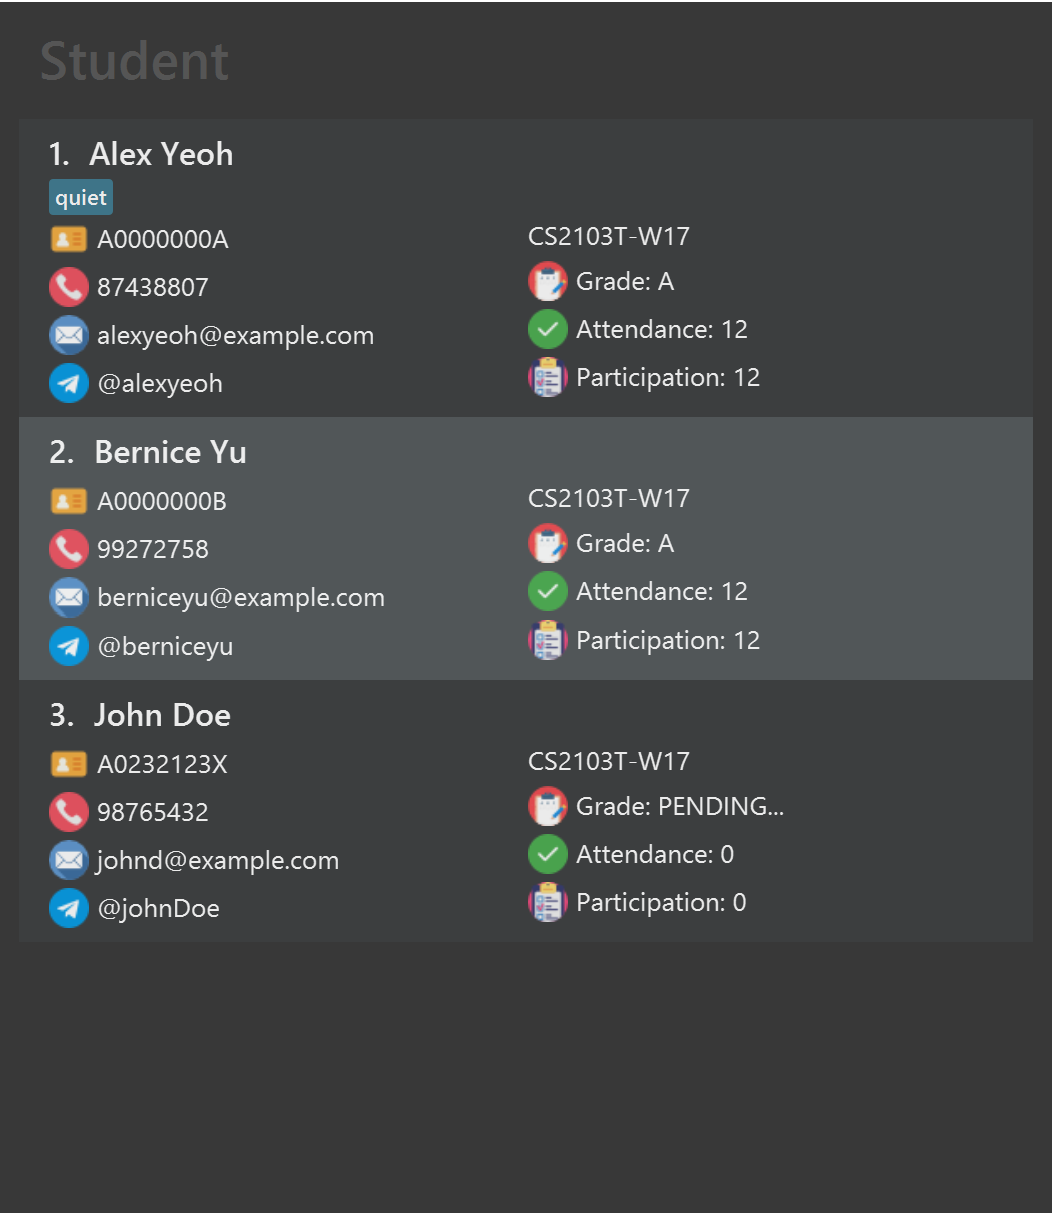
edit student 2 g/A t/Edits the grade of the 2nd student to beAand clears all existing tags. -
findm/CS2103Tfollowed byedit student 2 g/AEdits the grade of the 2nd student to beAin the results of thefindcommand.
| Before (example 2) | After (example 2) |
|
 |
5.1.4 Locating students by their attributes: find
Find students by name, student ID, module or tutorial, by checking if respective criteria contains any of the given keywords.
Format: find [n/NAME] [i/STUDENT_ID] [m/MODULE] [tut/TUTORIAL]
- At least one of the optional fields must be provided.
- The search is case-insensitive. e.g.
hanswill matchHans - The order of the keywords does not matter. e.g.
Hans Bowill matchBo Hans - Only full words will be matched e.g.
Hanwill not matchHans - Students matching at least one keyword will be returned (i.e.
ORsearch). e.g.Hans Bowill returnHans Gruber,Bo Yang -
findacross different prefixes is aANDsearch. e.g.find n/John m/CS2105will return students matchingJohnwho are also inCS2105, if the students exist in ModQuik. -
findworks on the entire list of students and successive find commands are independent of each other. e.g.find n/Johnfollowed by findfind m/CS2103will not find students matchingJohninCS2103. It will first display all students matchingJohn, then display all students inCS2103.
Examples:
-
find n/JohnreturnsjohnandJohn Doe -
find m/CS2103Treturns list of students in CS2103T

5.1.5 Deleting a student: delete student
Deletes the specified student from the list of students.
Format: delete student INDEX
- Deletes the student at the specified
INDEX. - The index refers to the index number shown in the displayed student list.
- The index must be a positive integer 1, 2, 3, …
Examples:
-
listfollowed bydelete student 2deletes the 2nd student in the list of people. -
findn/Betsyfollowed bydelete student 1deletes the 1st student in the results of thefindcommand. -
findm/CS2103Tfollowed bydelete student 2deletes the 2nd student in the results of thefindcommand.
5.1.6 Extracting student’s emails: extract emails
Copies all emails in the displayed student list onto the clipboard.
Format: extract emails
1. Execute the
extract emails command in the ModQuik command box. The following message will be displayed in the Results Display Box: 
2. A link will be copied onto your clipboard. Go to your web browser and paste the emails onto your address bar. Your mail app will be prompted to open.

3. All the emails should be pasted as shown:

Examples:
-
findm/CS2103Tfollowed byextract emailscopies all the emails of the students in the results of thefindcommand.
5.2 Tutorial Features
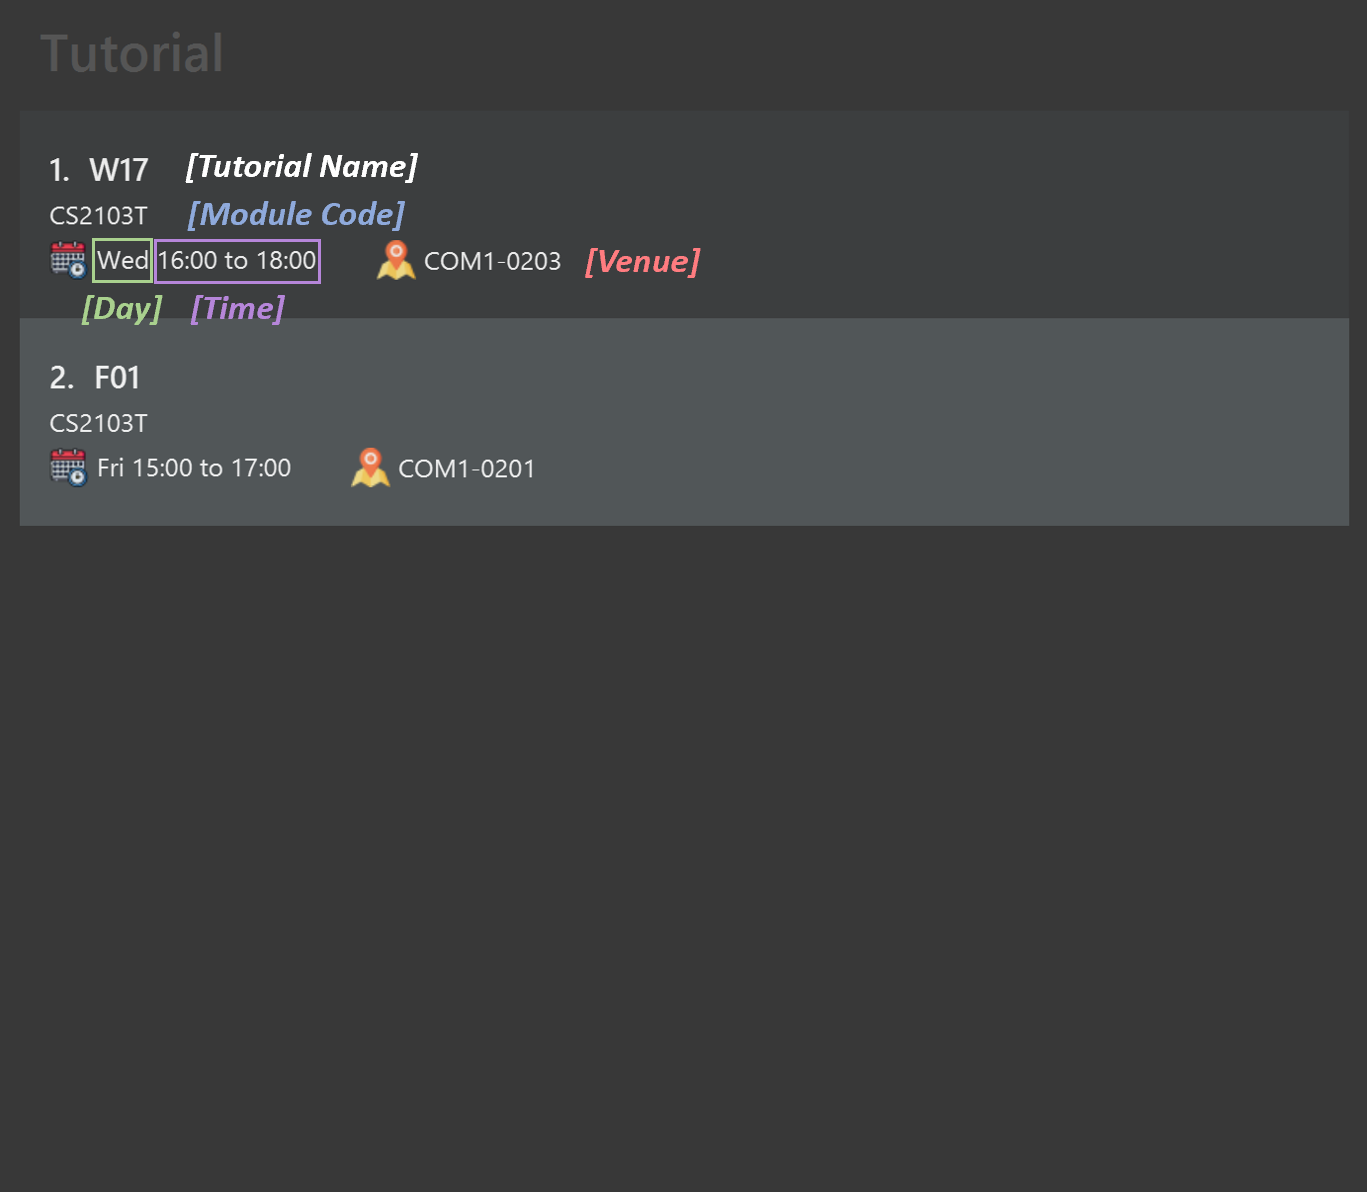
5.2.1 Adding a tutorial: add tutorial
Adds a tutorial to ModQuik. Simply add any tutorial that you are teaching and keep track of it.
Format: add tutorial n/NAME m/MODULE v/VENUE T/TIMESLOT D/DAY
-
DAYtakes in a number from 1 (Monday) to 7 (Sunday). -
TIMESLOTtakes in a start time to end time in the format HH:mm-HH:mm, e.g., 18:00-20:00. - The system does not allow adding duplicate tutorials - as defined as the tutorial having the same name and same module, ignoring case.
Examples:
add tutorial n/T23 m/CS2103T v/COM1-0205 T/18:00-20:00 D/1
5.2.2 Editing a tutorial: edit tutorial
Edits an existing tutorial in ModQuik.
Format: edit tutorial INDEX [n/NAME] [m/MODULE] [v/VENUE] [T/TIMESLOT] [D/DAY]
- Edits the tutorial at the specified
INDEX. The index refers to the index number shown in the displayed tutorial list. The index must be a positive integer 1, 2, 3, … - At least one of the optional fields must be provided.
- Existing values will be updated to the input values.
- When editing the timeslot or the day, both fields must be given.
Examples:
-
edit tutorial 2 v/Zoom T/14:00-16:00 D/5Edits the venue of the 2nd tutorial to beZoom, sets tutorial time to be14:00 to 16:00and sets tutorial day to beFri.
5.2.3 Deleting a tutorial: delete tutorial
Deletes a specified tutorial from ModQuik.
Format: delete tutorial INDEX
- Deletes the tutorial at the specified
INDEX. - The index refers to the index number shown in the displayed tutorial list.
- The index must be a positive integer 1, 2, 3, …
Examples:
delete tutorial 2
5.3 Consultation Features
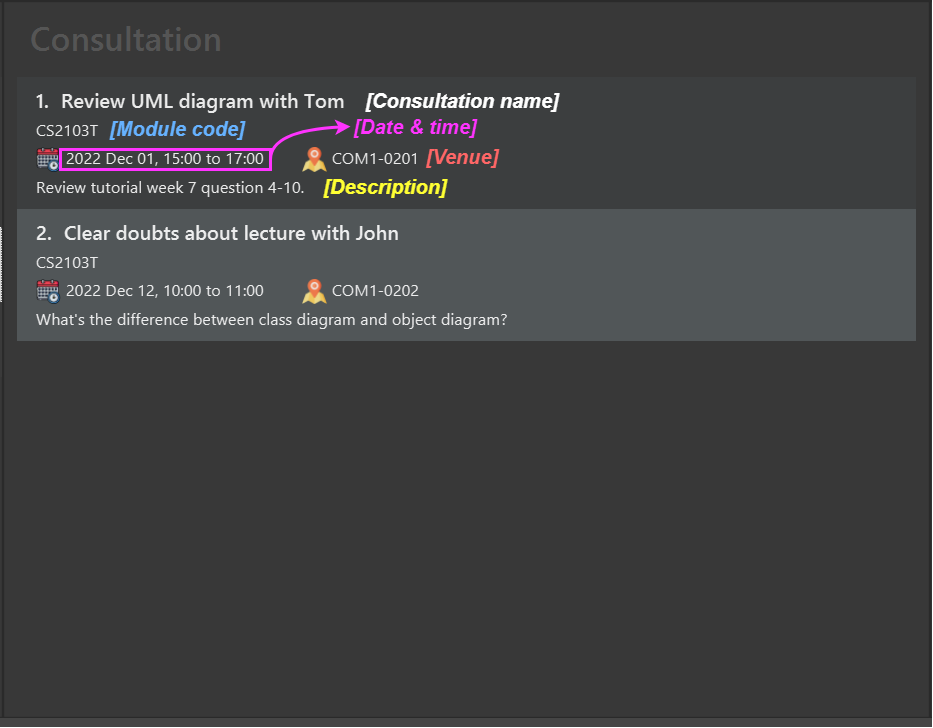
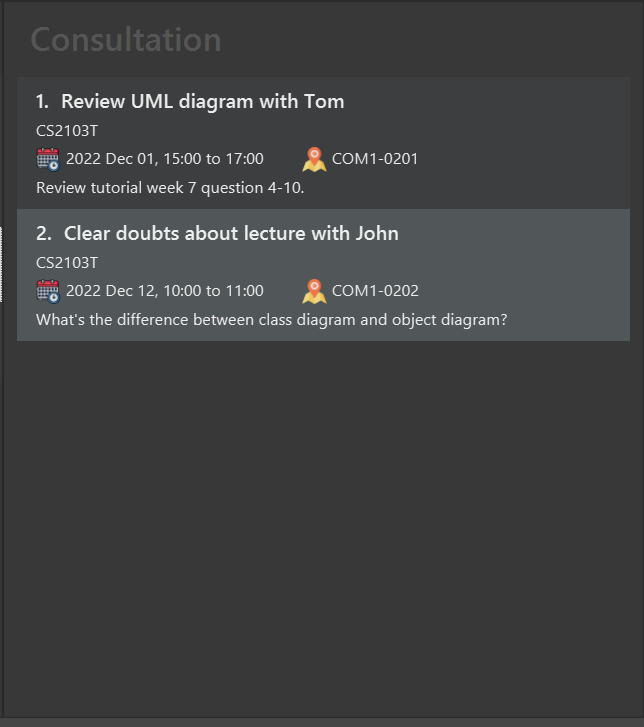
5.3.1 Adding a consultation: add consultation
Adds a consultation slot to ModQuik. You can use this whenever a student wants to schedule a consultation with you.
Format: add consultation n/NAME m/MODULE v/VENUE D/DATE T/TIMESLOT d/DESCRIPTION
-
DATEshould be given in the format yyyy-MM-dd, e.g. 2022-10-24. -
TIMESLOTtakes in a start time to end time in the format HH:mm-HH:mm, e.g., 18:00-20:00. - You can add consultations from the past to keep track of all your consultations and progress throughout the semester.
- In rare cases, ModQuik will autocorrect invalid dates. See here for more details.
Examples:
add consultation n/Review past year paper m/CS2103T v/COM2-0109 D/2022-12-12 T/16:00-18:00 d/AY2019-2020 Question 3,6,8
| Before | After |
 |
 |
5.3.2 Editing a consultation: edit consultation
Edits an existing consultation in ModQuik.
Format: edit consultation INDEX [n/NAME] [m/MODULE] [v/VENUE] [T/TIMESLOT] [D/DATE] [d/DESCRIPTION]
- Edits the consultation at the specified
INDEX. The index refers to the index number shown in the displayed consultation list. The index must be a positive integer 1, 2, 3, … - At least one of the optional fields must be provided.
- Existing values will be updated to the input values.
- When editing the timeslot or the date, both fields must be given.
- In rare cases, ModQuik will autocorrect invalid dates. See here for more details.
Examples:
-
edit consultation 2 T/14:00-16:00 D/2023-11-21Edits the timeslot of the 2nd consultation to be14:00 to 16:00and sets consultation date to2023 Nov 21. -
edit consultation 1 v/ZoomEdits the venue of the 1st consultation to beZoom.
5.3.3 Deleting a consultation: delete consultation
Deletes a specified consultation from ModQuik.
Format: delete consultation INDEX
- Deletes the consultation at the specified
INDEX. - The index refers to the index number shown in the displayed consultation list.
- The index must be a positive integer 1, 2, 3, …
Examples:
delete consultation 3
5.4 Reminder Features
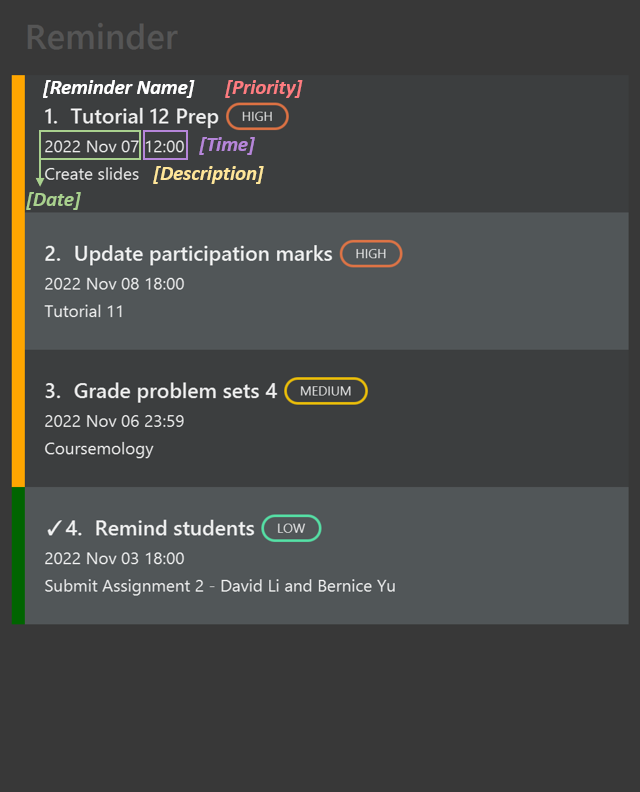
5.4.1 Adding a reminder: add reminder
Adds a reminder to ModQuik. You can add reminders such as “Mark Assignment 1” by a specified deadline.
Format: add reminder n/NAME T/TIME D/DATE p/PRIORITY d/DESCRIPTION
-
PRIORITYis case-insensitive and can only be eitherHIGH,MEDIUMorLOW. -
DATEshould be given in the format yyyy-MM-dd, e.g. 2022-10-24. -
TIMEshould be given in the format HH:mm, e.g., 18:00. - You can add reminders from the past to keep track of all your tasks and progress throughout the semester.
- You cannot add 2 reminders of the same name, date, time and description as they are considered duplicate.
- Whenever a reminded is added, it will be automatically sorted by priority, just like when
sort reminder by/priorityis used so that the tasks deemed most important are shown at the top of the list. - In rare cases, ModQuik will autocorrect invalid dates. See here for more details.
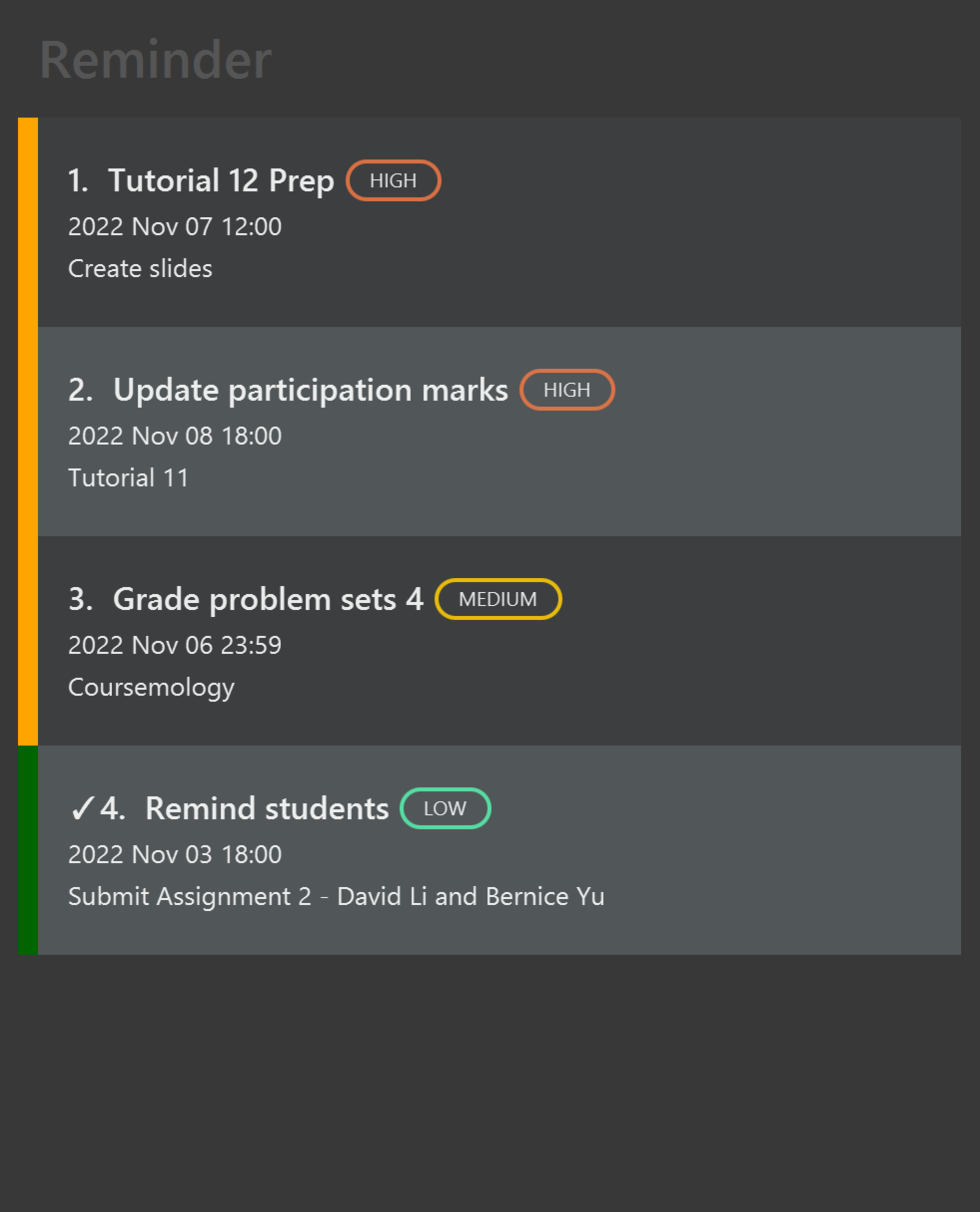
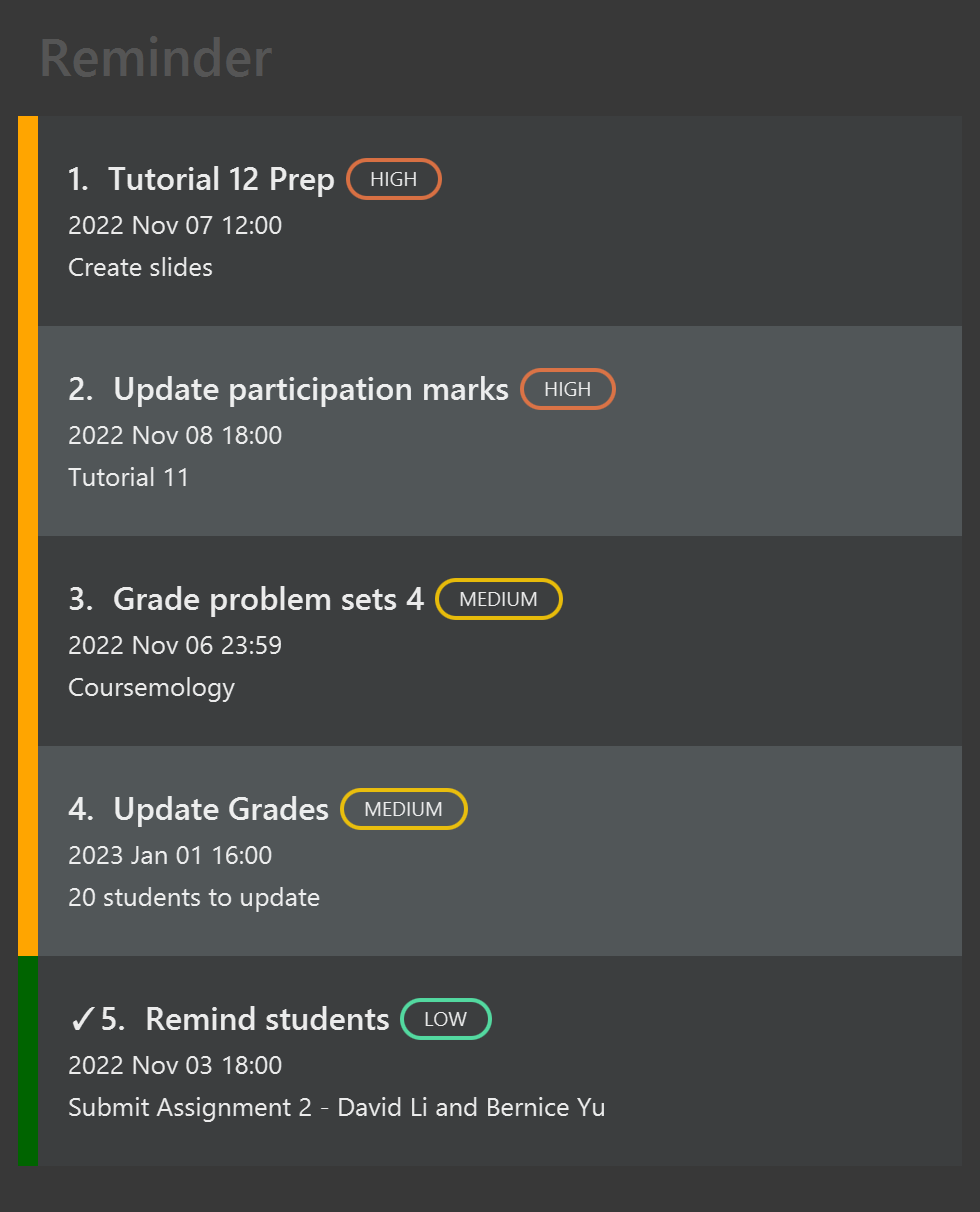
Examples:
add reminder n/Mark Midterms D/2023-01-01 T/15:00 d/30 papers to mark p/HIGHadd reminder n/Update Grades T/16:00 D/2023-01-01 d/20 students to update p/MEDIUM
| Before (example 2) | After (example 2) |
 |
 |
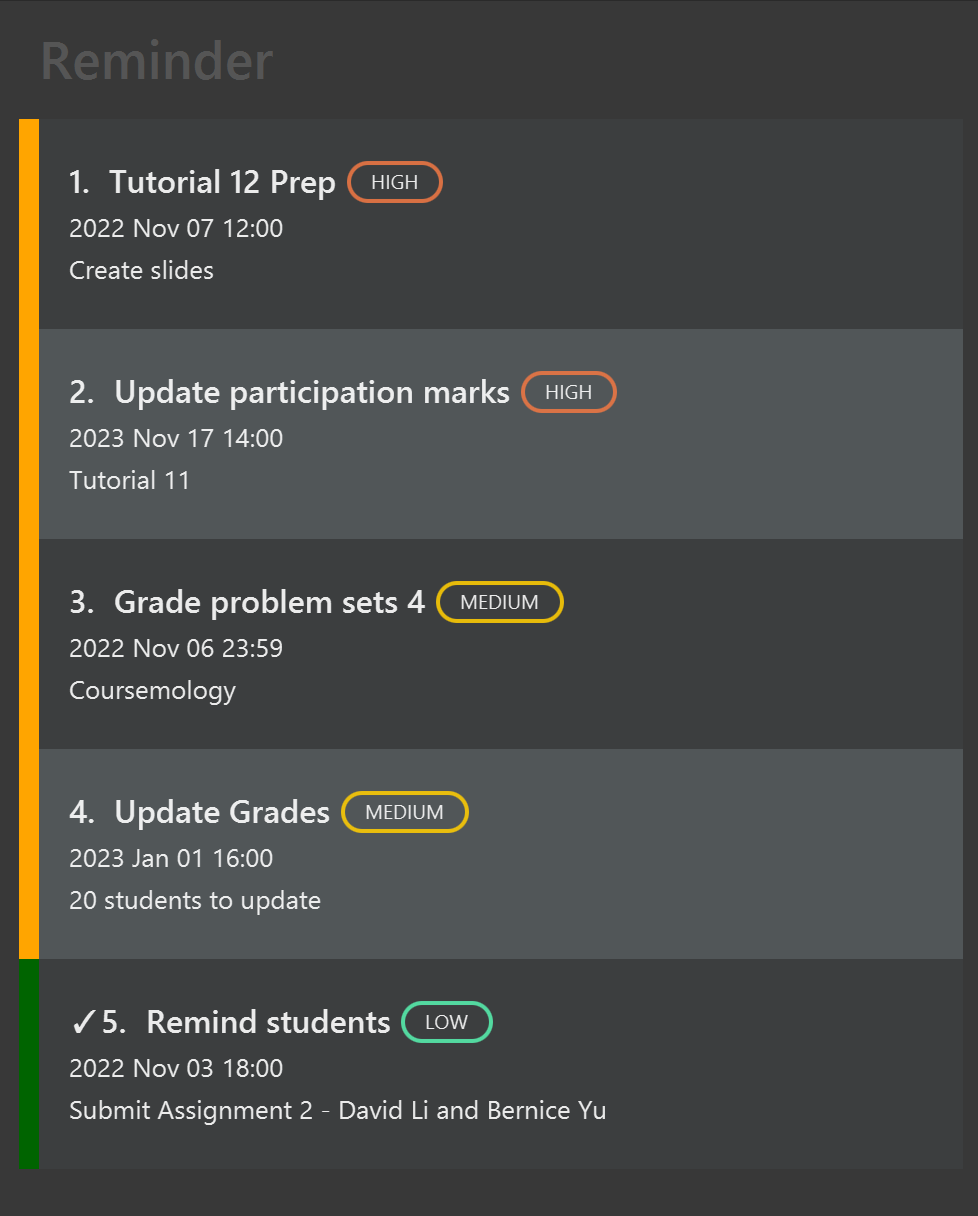
5.4.2 Editing a reminder: edit reminder
Edits an existing reminder in ModQuik.
Format: edit reminder INDEX [n/NAME] [T/TIME] [D/DATE] [p/PRIORITY] [d/DESCRIPTION]
- Edits the reminder at the specified
INDEX. The index refers to the index number shown in the displayed reminder list. The index must be a positive integer 1, 2, 3, … - At least one of the optional fields must be provided.
- Existing values will be updated to the input values.
-
PRIORITYis case-insensitive and can only be eitherHIGH,MEDIUMorLOW. - When editing the
DATEorTIME, both fields must be given. - In rare cases, ModQuik will autocorrect invalid dates. See here for more details.
Examples:
-
edit reminder 1 p/LOWEdits the priority of the 1st reminder to beLOW. -
edit reminder 2 T/14:00 D/2023-11-17Edits the time of the 2nd reminder to be14:00and the date to2023 Nov 17.
| Before (example 2) | After (example 2) |
|
 |
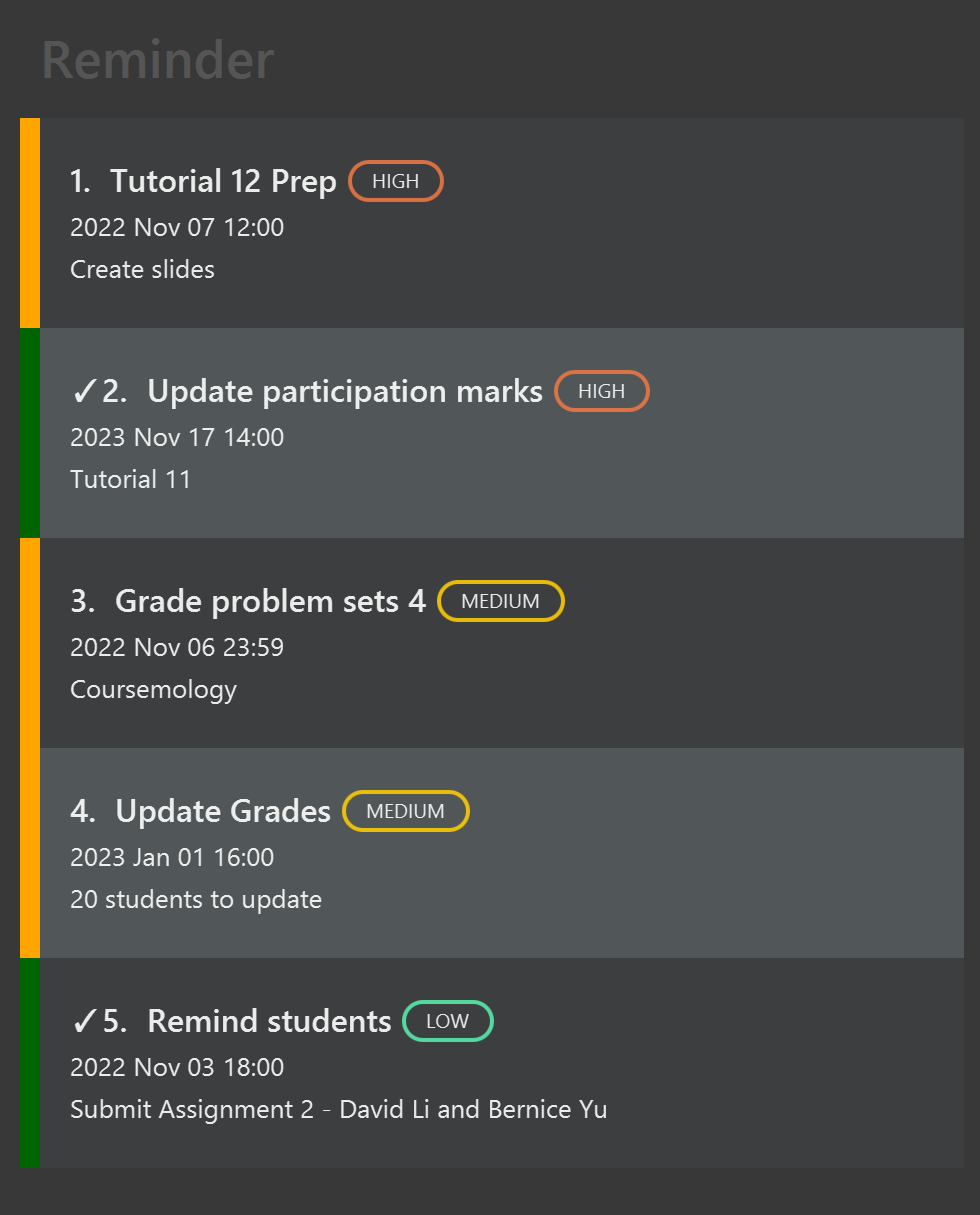
5.4.3 Mark a reminder: mark reminder
Sets the reminder status as completed.
Format: mark reminder INDEX
Examples:
mark reminder 2
| Before | After |
|
 |
5.4.4 Unmark a reminder: unmark reminder
Sets a reminder status as incomplete.
Format: unmark reminder INDEX
Examples:
unmark reminder 3
5.4.5 Deleting a reminder: delete reminder
Deletes the specified reminder from ModQuik. Users can delete a reminder if they think it is no longer relevant.
Format: delete reminder INDEX
- Deletes the reminder at the specified
INDEX. - The index refers to the index number shown in the displayed reminder list.
- The index must be a positive integer 1, 2, 3, …
Examples:
delete reminder 3
5.4.6 Sort reminders: sort reminder
Sort reminders by a chosen criteria. Users would be able to view the list of reminders based on the criteria they want.
Format: sort reminder by/SORT_CRITERIA
-
SORT_CRITERIAmust either bepriorityordeadline. - Specifying
prioritywill sort reminders by their priority, withHIGHon top of the list, followed byMEDIUMandLOW. Reminders with the same priority will then be sorted by date, from earliest to latest chronologically. At a glance, the user can see how many reminders are still pending or already completed for each priority. - Specifying
deadlinewill sort reminders by their deadline, with the earliest date on top of the list. Reminders with the same deadline will then be sorted by descending priority level, with the same order as stated above. - Reminders with the same priority and deadline will then be sorted lexicographically.
- Sorting does not take reminders’ status into account.
Examples:
sort reminder by/prioritysort reminder by/deadline
5.5 Switch tabs: switch
Switch command allows users to navigate between different tabs without the mouse which is crucial for our application as the target user are fast-typists who prefer typing over other means of input.
Format: switch f/FIELD
-
FIELDincludes:student,tutorial,consultation,grade
Examples:
-
switch f/tutorialwill switch tabs and display the tutorial list. -
switch f/gradewith switch tabs and display a pie chart showing an overview of the number of students in each grade category.
5.6 Clearing data: clear
Clears all existing data in a specific field (including student, tutorial, reminder and consultation) or the entire app.
For example, user might choose to reset the data when the semester ends to prepare for the upcoming semester.
Format: clear f/FIELD
-
FIELDincludingall,student,tutorial,consultation,reminder*
Examples:
clear f/all
5.7 Viewing help: help
Shows a message explaining how to access the help page.
Format: help
5.8 Exiting the program: exit
Exits the program.
Format: exit
5.9 Saving the data
All data in ModQuik is saved in the hard disk automatically after executing any command that changes the data. There is no need to save manually.
5.10 Editing the data file
All data in ModQuik is saved as a JSON file [JAR file location]/data/modquik.json. Advanced users are welcome to update data directly by editing that data file.
5.11 Archiving data files [coming in v2.0]
Details coming soon…
5.12 Add existing student into multiple modules [coming in v2.0]
Details coming soon…
6. FAQ
Q: How do I transfer my data to another computer?
A: Install the app in the other computer and overwrite the empty data file it creates with the file that contains the data of your previous ModQuik home folder.
Q: How do I toggle between tabs at the side panel?
A: Method 1: Use the switch tabs command.
Method 2: Click on the Tab button, and it will toggle between all 4 tabs (Student, Grade Chart, Consultation, Tutorial).
Q: How do I start the app? Double-clicking the jar file does not seem to do anything.
A: Double-clicking on a jar file may not always start the app. If that is the case, run the command java -jar ModQuik.jar in the same folder as the jar file.
Q: All my data is lost and I’m not sure why…
A: The data file may have been accidentally moved out of the data folder. If that is the case, move the data file back and restart the app.
You can also try looking in your trash bin to check if the file was accidentally deleted.
Q: How do I uninstall ModQuik?
A: We are sad to see you go :(( Uninstalling ModQuik is as simple as deleting the ModQuik.jar file.
7. Appendix
7.1 Glossary
| Term | Description |
|---|---|
| Command Line Interface (CLI) | User interface that allows users to use text as commands to be executed by an application. |
| Graphical User Interface (GUI) | User interface that allows users to interact with an application through graphics and visuals |
| Command | User-specified instruction that ModQuik will execute. e.g., add student and find
|
| Parameter | A component of the command that the user will need to input. e.g., sort reminder by/deadline where deadline is the parameter. |
| Prefix | Abbreviation of the name of the parameter followed by a /. User will need to type the prefix before the parameter in ModQuik.e.g., sort reminder by/deadline where by/ is the prefix. |
| Lexicographically | Generalization of the alphabetical order of the dictionaries |
7.2 Additional notes
7.2.1 Instructions on installing Java 11
- Check that you have Java 11 installed by running
java --versionin your terminal. The output should similar to this:openjdk 11.0.12 2021-07-20 LTS OpenJDK Runtime Environment Zulu11.50+19-CA (build 11.0.12+7-LTS) OpenJDK 64-Bit Server VM Zulu11.50+19-CA (build 11.0.12+7-LTS, mixed mode) - If Java 11 is not installed, visit this site to download.
- Repeat step 1 to ensure Java 11 has been installed correctly.
7.2.2 Note on autocorrecting invalid dates
ModQuik will assume some invalid dates to be correct and autocorrect the date to the last valid day of that month. See the below examples for a better explanation.
Examples:
-
add reminder n/mark papers D/2022-11-31 T/13:00 p/HIGH d/300 papers to markwill set a reminder on 2022 Nov 30 instead. ModQuik reasonably assumes that the user wishes to set the date on the last day of November. -
add reminder n/mark papers D/2023-02-29 T/13:00 p/HIGH d/300 papers to markwill set a reminder on 2023 Feb 28 instead, since 2023 is not a leap year, with 2023 February having 28 days. -
add reminder n/mark papers D/2024-02-30 T/13:00 p/HIGH d/300 papers to markwill set a reminder on 2024 Feb 29 instead, since 2024 is a leap year, with 2024 February having 29 days. -
add reminder n/mark papers D/2022-11-32 T/13:00 p/HIGH d/300 papers to markwill show an error instead. This is because none of the months have 32 days, and the date is more likely to be a user typo.
7.3 Command summary
| Action | Format, Examples |
|---|---|
| Add Student |
add student n/NAME i/STUDENT_ID ph/PHONE e/EMAIL tele/TELEGRAM_HANDLE m/MODULE tut/TUTORIAL [att/ATTENDANCE] [part/PARTICIPATION] [t/TAG]…e.g., add student n/John Doe i/A0000000J ph/98765432 e/johnd@example.com tele/johnDoe m/CS2103T tut/W17
|
| List All Students | list |
| Edit Student |
edit student INDEX [n/NAME] [i/STUDENT_ID] [ph/PHONE] [e/EMAIL] [tele/TELEGRAM_HANDLE] [m/MODULE] [tut/TUTORIAL] [att/ATTENDANCE] [part/PARTICIPATION] [t/TAG]…e.g., edit student 1 ph/91234567 e/jameslee@example.com
|
| Find |
find [n/NAME] [i/STUDENT_ID] [m/MODULE] [tut/TUTORIAL]e.g., find n/john m/CS2103T
|
| Delete Student |
delete student INDEXe.g., delete student 2
|
| Extract Student Emails | extract emails |
| Add Tutorial |
add tutorial n/NAME m/MODULE v/VENUE T/TIMESLOT D/DAYe.g., add tutorial n/T23 m/CS2103T v/COM1-0205 T/18:00-20:00 D/1
|
| Edit Tutorial |
edit tutorial INDEX [n/NAME] [m/MODULE] [v/VENUE] [T/TIMESLOT] [D/DAY]e.g., edit tutorial 1 n/W17 m/CS2103T
|
| Delete Tutorial |
delete tutorial INDEXe.g., delete tutorial 3
|
| Add Consultation |
add consultation n/NAME m/MODULE v/VENUE D/DATE T/TIMESLOT d/DESCRIPTIONe.g., add consultation n/Review past year paper m/CS2103T v/COM2-0109 D/2022-12-12 T/16:00-18:00 d/AY2019-2020 Question 3,6,8
|
| Edit Consultation |
edit consultation INDEXe.g., edit consultation 3 d/Review past year paper
|
| Delete Consultation |
delete consultation INDEXe.g., delete consultation 3
|
| Add Reminder |
add reminder n/NAME D/DATE T/TIME p/PRIORITY d/DESCRIPTIONe.g., add reminder n/mark papers D/2023-03-21 T/13:00 p/HIGH d/300 papers to mark
|
| Edit Reminder |
edit reminder INDEX [n/NAME] [D/DATE] [T/TIME] [p/PRIORITY] [d/DESCRIPTION]e.g., edit reminder 1 D/2023-01-01 T/14:00
|
| Mark Reminder |
mark reminder INDEXe.g., mark reminder 3
|
| Unmark Reminder |
unmark reminder INDEXe.g., unmark reminder 3
|
| Delete Reminder |
delete reminder INDEXe.g., delete reminder 3
|
| Sort Reminder |
sort reminder by/SORT_CRITERIAe.g., sort reminder by/deadline
|
| Switch Tabs |
switch f/FIELDe.g., switch f/tutorial
|
| Clear |
clear f/FIELDe.g., clear f/student
|
| Help | help |
| Exit | exit |
7.4 Prefix summary
- The prefixes
D/andT/, have more than 1 definition, depending on the type of command inputted.